
Painting cabinets can be challenging—but one that’s made easier with the right products and instructions.
By Tammy Adamson-McMullen
If your cabinets are looking old and tired, you don’t necessarily have to replace them. Why not paint them instead? Painted cabinets are a trend-forward and less expensive way of updating a space, while allowing you to introduce new colours at the same time.
If you choose to paint cabinets yourself, be forewarned: This project isn’t for the faint of heart. It takes time—four to seven days potentially—and a lot of patience to achieve successful results. It also takes some rudimentary painting skills. Don’t consider a DIY cabinet makeover if this will be your first time holding a paint brush!
That being said, the project can be made less challenging with the right products and instructions. Before you start, discuss the project with your local paint and decorating retailer. Tell the retailer about the condition of your existing cabinets and the results you want to achieve. Additionally, ask for the retailer’s input into the product list and instructions below, to see if he/she has any other insights that might help your specific situation.
Product List
In general, here’s what you’ll need:
Masking tape and pen
TSP
Deglosser
Caulk or putty
Sandpaper
Random orbit sander (optional but preferred)
Tackcloth
Primer
Topcoat
High-density foam roller
Angled brush
Project Instructions
Empty your cabinets and drawers.
Remove the shelves and doors and, as you go, use a masking tape and pen to label each piece with its proper location so that you can install it later in the right spot. (Tip: To make this step easier yet, label the pieces before you remove them and take a cellphone photo to serve as guide.)
Place each door flat on a work table or on two sawhorses. Make sure the work area is relatively free of dust and can be left undisturbed.
Next, remove all of the hardware from the cabinet boxes and doors, including hinges, handles and knobs.
Using a non-abrasive sponge and TSP, clean all of the cabinet surfaces thoroughly to remove oil, dirt and grime. Follow up with a liquid deglosser if surfaces are excessively oily or dirty or have a high-gloss finish.
Fill in holes and gauges with caulk or putty and let cure. Sand these areas until smooth.
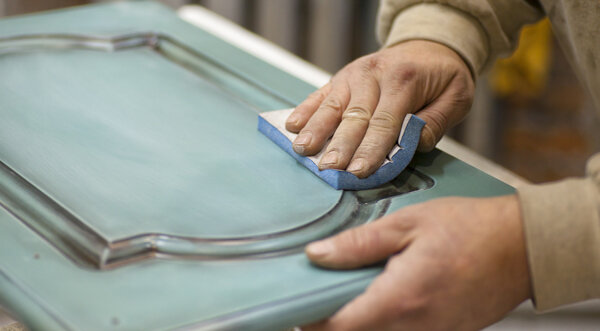
Rough up all of the cabinet surfaces with 100- to 220-grit sandpaper.
Vacuum the surfaces and rub them down with tack cloth to pick up leftover particles.
Apply thin and even primer coats to all of the surfaces you intend to paint. You may need two primer coats, depending on the original colour of the cabinet and the amount of grain you want to show. Use the roller for larger areas and the angled brush for smaller ones.
Make sure the first primer coat is completely dry before applying the second. Note: This step and step #13 will take time if you plan to paint both sides of your doors. Make sure each side of the door is totally dry before you turn it over to apply coats to the other side.
Once the primer coats have dried, sand all of the surfaces with 220-grit sandpaper until smooth. You may want to use a random orbit sander for this step, which can help you achieve more professional results
After sanding, thoroughly vacuum the surfaces again and rub them down with tack cloth.
Now it’s time to paint. Apply the topcoat to all of the primed surfaces—again, using a roller for larger surfaces and angled brush for smaller ones. Don’t rush this step. Work slowly and meticulously, allowing the paint to flow evenly.
Apply a second topcoat, making sure the first coat is completely dry beforehand.
Allow the cabinet boxes and doors to cure, using the cure times listed on the paint can label as a guide. Then reattach the hardware and install the cabinet doors.
Last but not least, stand back and enjoy your new kitchen—and relish in the pride of a job well done!