
Here’s how to give your walls the rich, textured look of leather.
By Diane Franklin
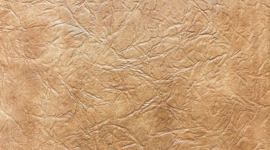
If you love the look of leather on your sofas, chairs or your most cherished books, you may be surprised to learn you can achieve that rich, textured appearance on your walls as well.
There are various ways to create a faux leather wall treatment, but using tissue paper is a great way to mimic the creases that are found in leathery textures. Below are the supplies needed and step-by-step instructions to accomplish an authentic leather appearance.
Supplies
Primer
Base Paint (Satin Finish. Tinted to Your Selected Color)
Optional: a 50/50 Mixture of Glue (such as Elmer’s) and Water
White Tissue Paper
Drop Cloths
Painters’ Tape
¼-inch Nap Rollers
4-inch Paintbrush
Water-base Glaze (Tinted)
Lint-free Rags
Step-by-Step Instructions
Prep the room with painters’ tape and drop cloths.
Prime the wall. Let dry.
Tear the tissue paper. Make irregular edges on all four sides to avoid straight lines, except for the pieces that go against the ceiling (and, if appropriate, the adjacent wall or walls that are not being faux-finished). For these pieces, you will need one straight edge of the tissue paper to go flush against these surfaces.
Crumble the tissue paper into balls and then open it up again to give it a wrinkled appearance.
Use the roller to apply the basecoat, applying the tissue paper to the wet paint as you go. Work with the paper to create wrinkles and creases that emulate the look of leather. Use the roller to apply basecoat over the tissue paper. This will be enough to adhere the tissue to the wall. However, an alternative method would be to use a 50/50 mix of glue and water to attach the tissue paper to the wall before applying the basecoat. When applying the tissue paper, make sure you line up the straight edges in the corners.
With each new piece of tissue paper, overlap the previous tissue paper about a quarter of an inch, working the paper to make the wrinkles look compatible from one piece to the next.
After the surface is dry, use a paintbrush to paint over the tissue paper with your water-base glaze. Make sure you work the paint into the wrinkles so that the basecoat doesn’t show through. Use your lint-free rags to work in the glaze and take off any excess.
Let dry and check for areas that need a touch-up, or if desired, you can give the whole wall another coat of glaze to add more depth and dimension.
Important: Please note that before proceeding with the project, it’s a good idea to try the technique on a sample board to perfect your technique, test your colors and ensure that you like the look.
Color Choices
This technique works better with colors that emulate the look of leather—for instance, a soft brown as the basecoat with a darker brown glaze as the topcoat. However, you also can go with something bold like red leather (which works great with black undertones). The effect also looks good in golds, greens or something more subtle like a yellow that looks like a faded book cover.
Faux leather walls look great in many rooms of the house, but work especially well in home offices or as focal walls in bedrooms, dining rooms or formal living rooms. Let your imagination be your guide to envision the countless possibilities of this rich, sophisticated finish.